
Git vs GitHub
Many beginner developers don’t actually know the difference between Git and GitHub, which will be crucial for understanding this tutorial. So let’s go over it:
Git
Git is a source control tool developed by Linus Torvalds, the creator of Linux. (he actually made it in just 5 days)
Whenever you are using a git command like git add, git commit, or
git push, you are using Git.
Features of Git
- Repositories
- Commits
- Branches
- Merges
- Remotes
- etc.
GitHub
GitHub is a web-based platform made by Microsoft that allows developers to host their Git repositories and collaborate with others.
Creating a Git repository does not inherently mean that you are using GitHub. In fact there are many other platforms for hosting your Git repositories like Bitbucket or GitLab. (you could even host it yourself) A Git repo can also just exist locally on your computer.
Features of GitHub
- Pull requests
- Issues
- etc.
What makes a Git repository?
We can start a new repo by running the following commands in the project directory:
# You only need to run this once, it will configure Git to work
# better with the GitHub standard
git config --global init.defaultBranch main

# This is the actual command that initializes the repo
git init
There is no magic involved, all this will do is create a new hidden folder
called .git. This folder contains all the information about the Git
repository. All commits, branches, etc. will be stored in this folder.
Your project is now a Git repository.
Let’s talk about commits
To put it simply, a commit is a collection of changes that represent the state of your project.
Practically, commits are like “save points” in videogames. Once a commit exists, you can go back to it at any time.
Every commit has a unique hash that is used to identify it and a message that is used to explain what the commit does. One more thing important to us is the author, which is the person who created the commit. To identify ourselves when we commit, we need to configure Git.
Configuring Git
Every commit must have a username and email associated with its author. We can set our own username and email by running the following commands:
# Replace capitalized fields with your own information
git config --global user.name "YOUR_NAME"
git config --global user.email "YOUR@EMAIL.COM"
You can also set these values per repository by omitting the
--globalflag.
When you are planning to push your changes to a remote repository (like GitHub), it is best to set your username and email to match your (GitHub) account.
After this step, we should finally be ready to commit our changes.
Adding files to Git
We can check the status of our files by running the following command:
git status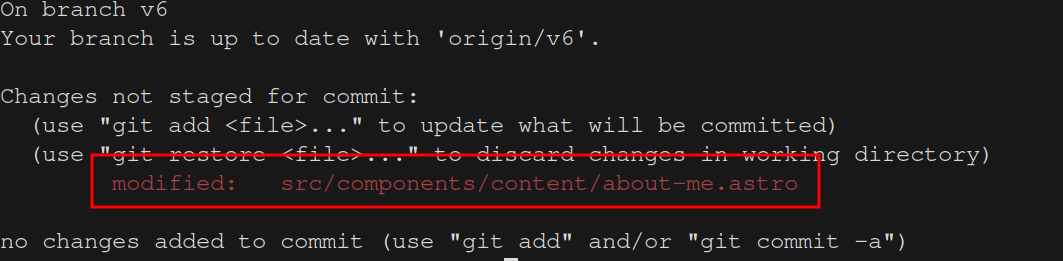
As you can see here, we have some unstaged files. (marked red)
Ignoring files
Sometimes, we need to hide some files from Git. We can do this by adding
them to the .gitignore file. (the file should be located in the root
of the repository and literally named “.gitignore”)
We usually (and most importantly) want to ignore files that contain
sensitive information, like API keys. These are usually located in the
.env file, which should always be ignored. We should also ignore files
that are not relevant to our project or easily recreated. Some examples
include:
distor other build artifactsnode_modules.DS_Store(for macOS)
Let’s create an example .gitignore file:
# Protect environment variables
.env

# Protect macOS users
.DS_Store

# Ignore build artifacts
bin
obj
*.out
*.exe
Ignored files will not be tracked by Git and will not show up in the
git status command.
Staging
When we want to commit some changes, we need to stage them. We can stage a single file by running the following command:
# Replace <path to file> with the path to your file
git add <path to file>
Staged files are files that are ready to be committed. We can choose what files are supposed to be committed in case we don’t want to commit everything at once. However, usually we do want to commit everything at once. We can stage all changes by running the following command:
git add .Committing
Once we have staged our changes, we can commit them by running the following command:
# Replace <commit message> with a message that describes the changes
git commit -m "<commit message>"
This will add all the staged files to a new commit with the given message. Commit messages are conventionally written in present tense, like “Add a new feature”.
You first commit might look like this:
git commit -m "Add files"Viewing commits
If you want to see your past commits, you can run the following command:
git logThis will also show some additional information about each commit, like the hash, author, and branch, which we will cover later.
Connecting to GitHub
We should now have a working Git repository on our local machine. We can commit our changes, roll back if necessary, or use branches or any other Git features.
However, there might come a time when we want to collaborate on our project
with someone else, or just simply have our project backed up outside
of our machine. (remember, you can still lose your project when using
Git if the .git directory gets removed)
This is where a remote repository comes in. In this tutorial, we will be using GitHub, but many alternatives exist and the setup process is very similar.
Setting up an account
After you’ve created a GitHub account, (preferably with the same email as your Git config), you need to connect it to our Git CLI in order to have authenticated access to your GitHub account and repos.
We will start by downloading the GitHub CLI. Follow the installation process and verify the installation by running:
gh --versionIf you see the version number, you are good to go. Otherwise try restarting your terminal or system.
Now we need to authenticate our CLI by running:
gh auth loginThis will prompt you to log in with your GitHub credentials. After completing the authentication process, we can continue with setting up our remote repository.
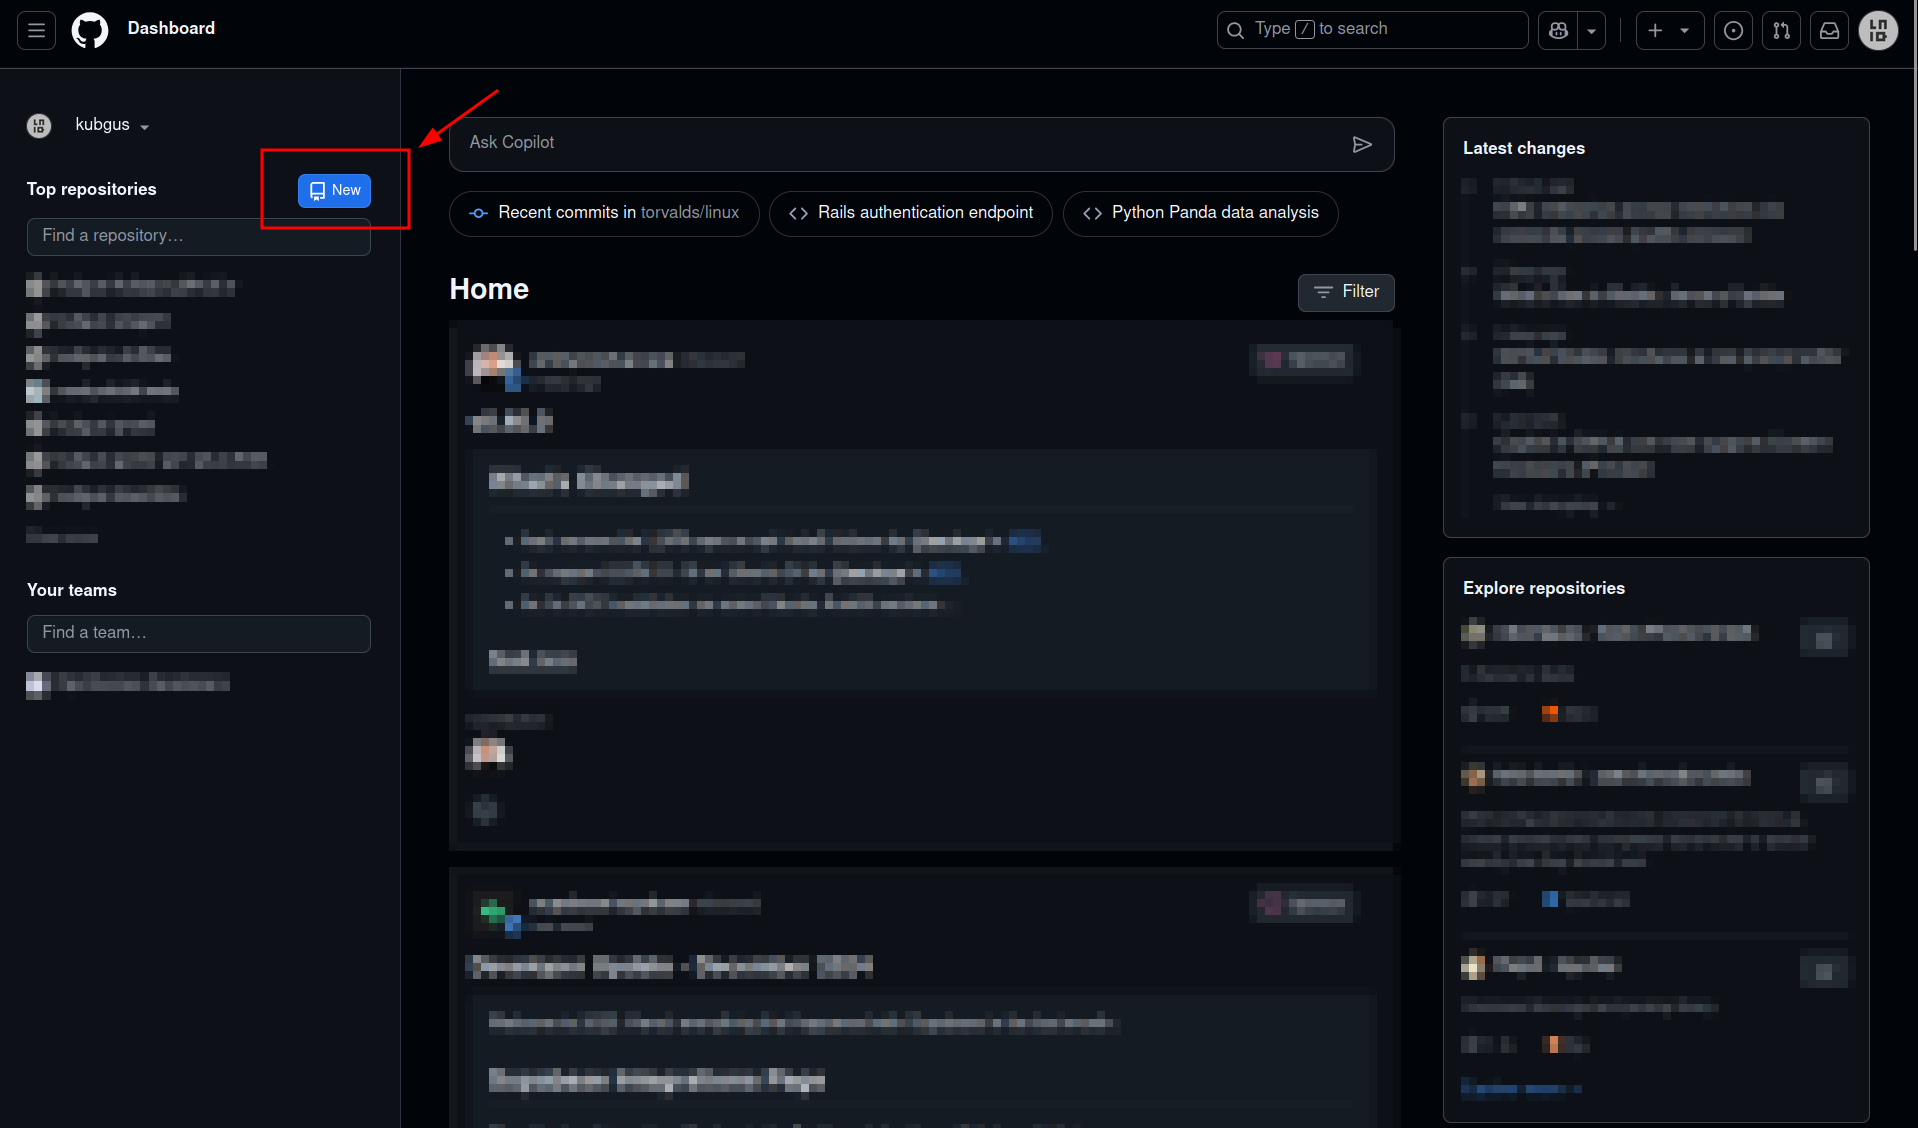
Creating a GitHub repository
You can create a new repository by clicking “New” on the GitHub dashboard:
You should see a page like this:
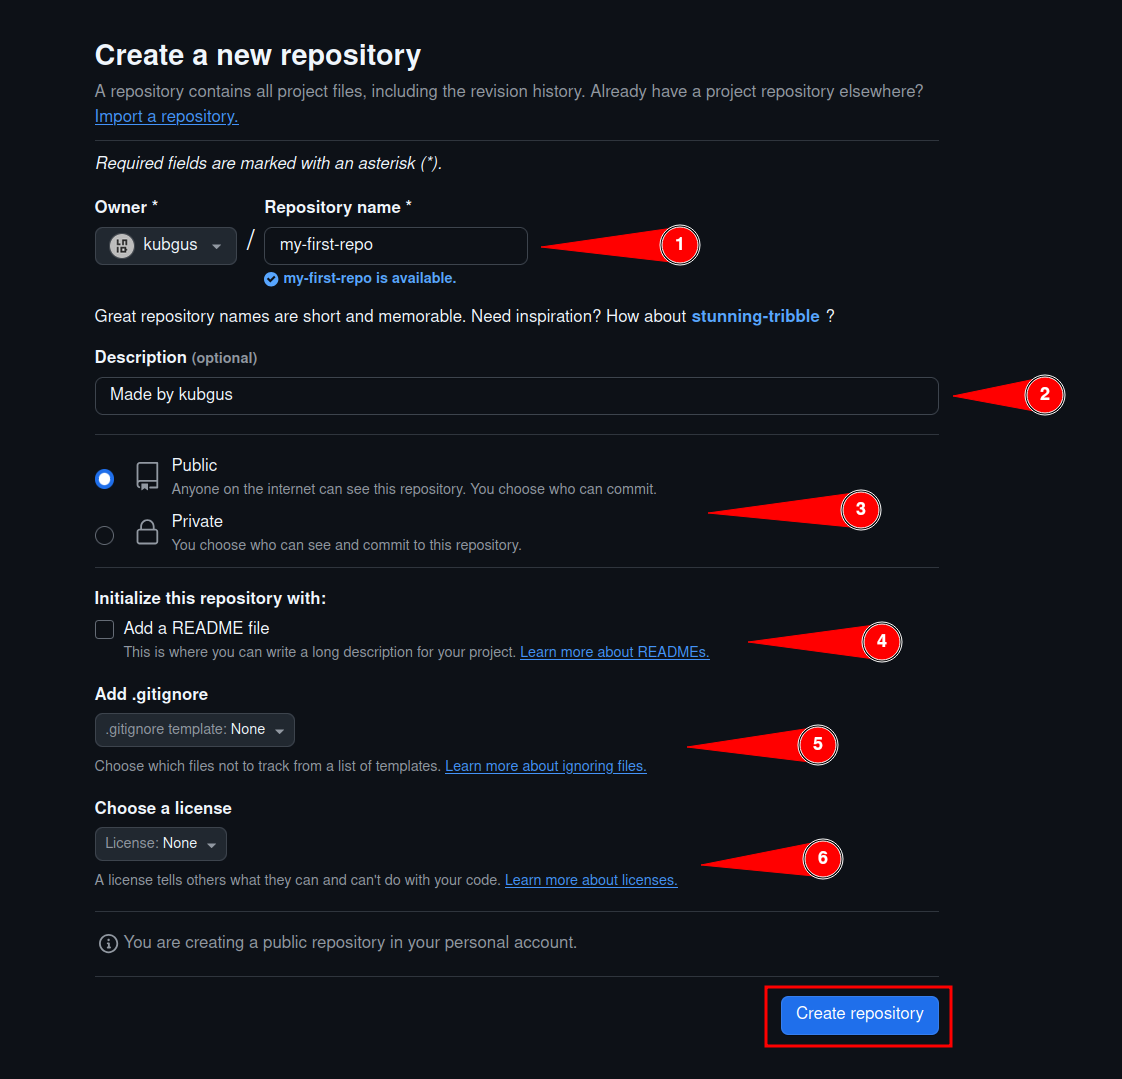
- Enter a name for your repository, conventionally in
kebab-case - Write a short description to describe your repository
- Public/Private
- Choosing “Public” will make your repository visible on your profile and accessible by anyone - good for open source projects
- Choosing “Private” will only make the repository visible to you and people you invite as collaborators
- Note that a private repository is still hosted on GitHub’s servers, so you still should not store any sensitive information in it either way
- README file
- The “README.md” file serves as the repository’s “long description” on GitHub and can be used to explain what the repository is about, how to use it, etc.
- This is generally only useful for public, open source projects or large teams
- Add .gitignore file
- If you are using a certain technology or
language, there are good chances GitHub has a premade
.gitignorefile for it - If you want to add a
.gitignoretemplate from GitHub and you already have a local repository, make sure to remove the existing.gitignorefile first
- If you are using a certain technology or
language, there are good chances GitHub has a premade
- Choose a license
- This is generally only applicable for open source projects, or projects that you are planning to make open source
- We are going to leave this off for now, as it is not in the scope of this tutorial
After you fill out all the required fields, click “Create repository”. You’ll be greeted with a page like this:
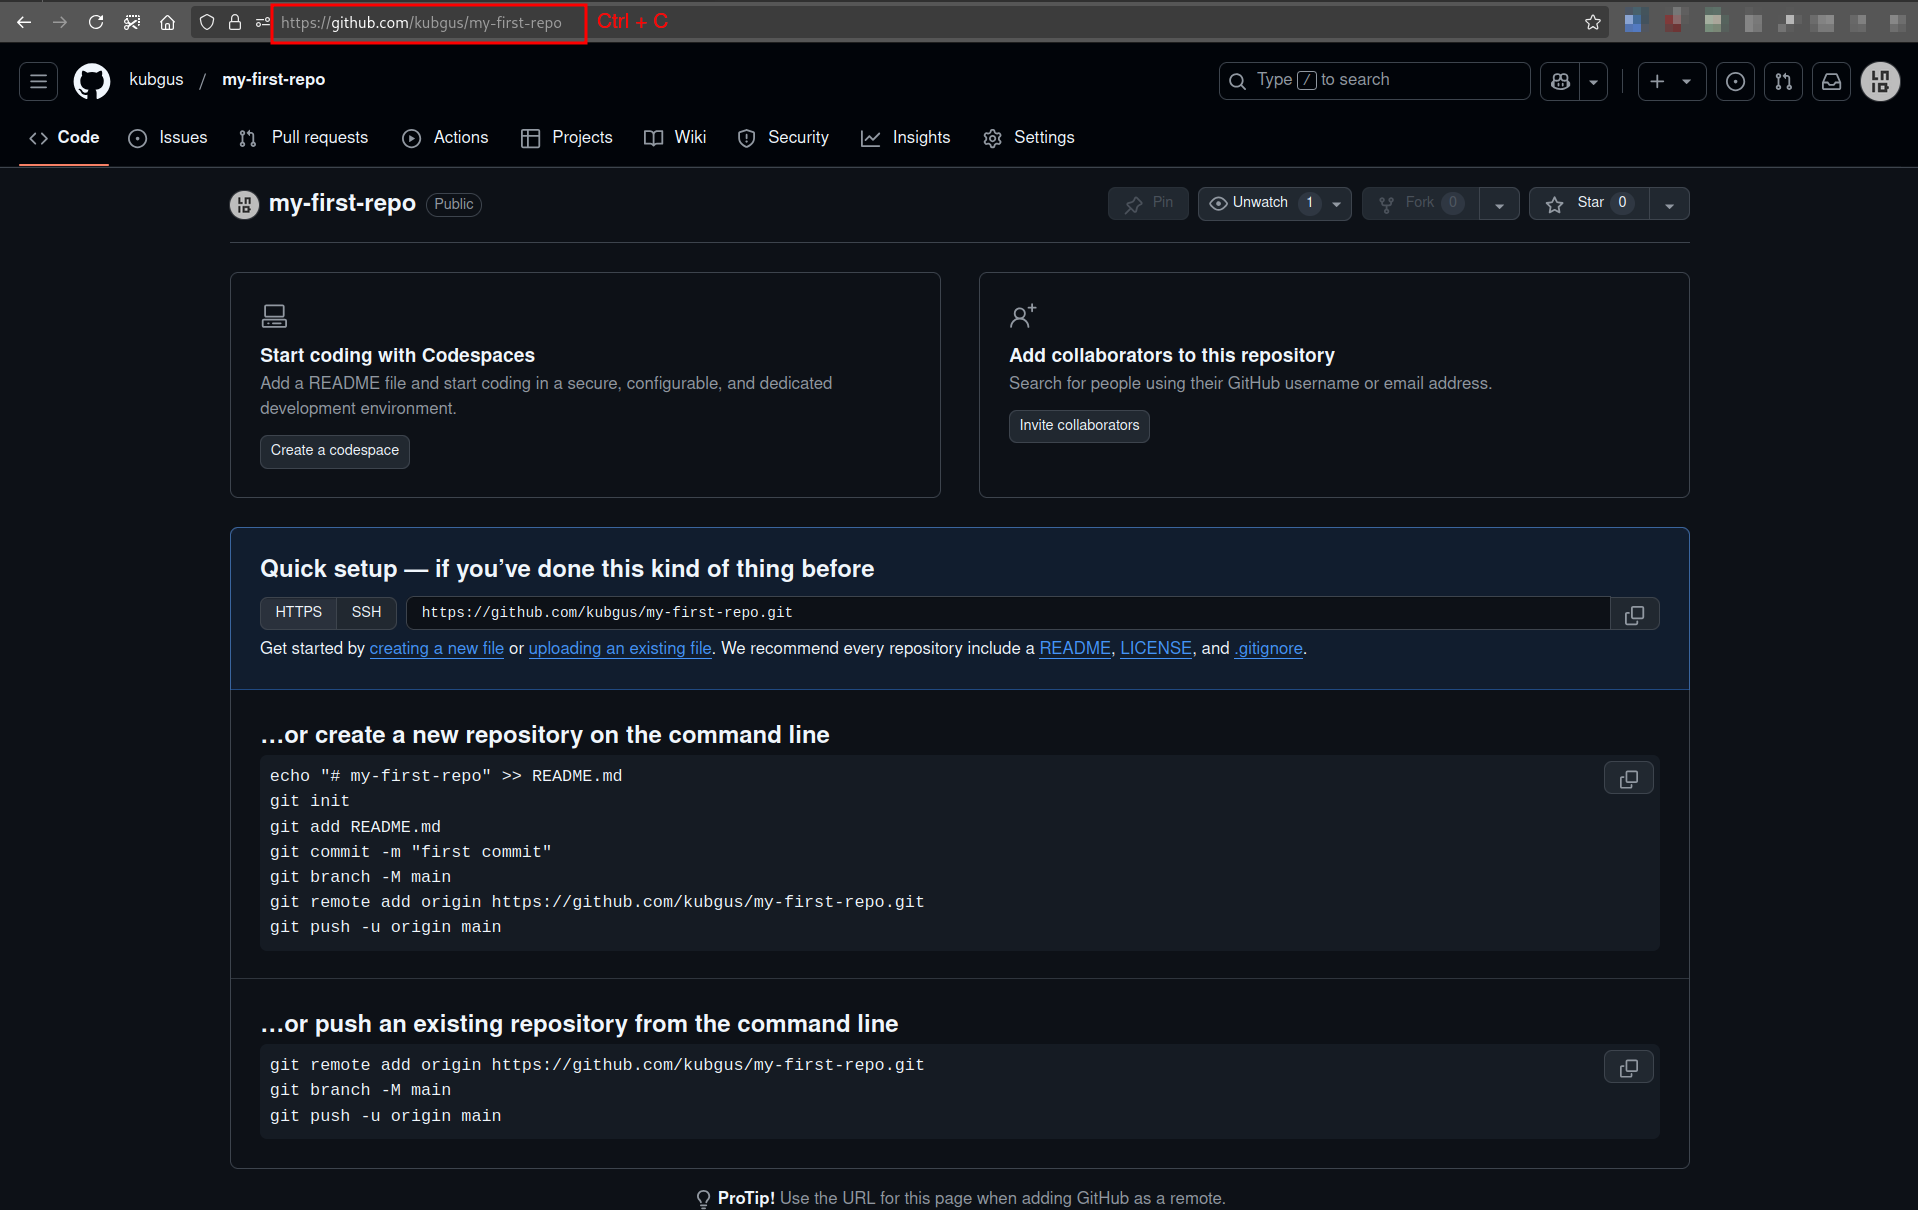
We could follow the instructions on the screen under ”… push an existing repository from the command line”, however, we don’t want to just blindly copy and paste the commands into our terminal, so let’s go over the steps one by one:
Adding a remote to our repository
Let’s go back to our local repository. We can now use the remote feature of
Git to connect a remote repository to our local repository.
To add a remote, we will use the git remote add <name> <url> command.
Conventionally, the name of the remote is called “origin”, and the URL will
simply be the URL of the repository on GitHub. (copied from the address bar
as shown in the picture above)
Let’s run the command:
# Replace YOUR/REPO with the name of your repository
# or just replace the whole URL with your one
git remote add origin https://github.com/YOUR/REPO/
Now we have a remote repository that we can push our changes to and pull them
from. Note that branches will exist locally (like main) and remotely, which
will usually see them prefixed with origin/ (or your remote name), so
we will see, for example origin/main.
Interacting with our remote repository - Pushing and pulling
Pushing and pulling are the two main ways to interact with our remote by syncing our local repository with the remote repository.
Pulling is when we want to download changes from the remote repository. We can do this by running the following command:
git pull origin mainYou should always pull first before commiting new changes to make sure your local repo is up-to-date with the remote, otherwise you might end up with merge conflicts.
Pushing is when we want to upload our local commits to the remote repository. We can do this by running the following command:
git push -u origin mainThe -u flag stands for --set-upstream, which will set the remote branch
to the default remote branch to push to. This means the next time
we want to push, we can just run git push.
After pushing, we should see files pop up in our GitHub repository in our browser. And that is basically done!
The Git Workflow
After this set up, we can clone the repository from any authenticated computer
with git clone <url> and work on it committing, pushing, etc.
In the next tutorial, we will look at how to become a pro at resolving merge conflicts.